Lighting a Fire & General Stove Maintenance
Lighting the Stove
Please read the stove manual to familiarise yourself with the air controls so you understand what positions they need to be set at for lighting, burning & reloading.
The first few fires must be kept small to settle the stove in and cure the paint, during these fires the stove can give off a non-toxic odour and some smoke to the room. The pain can also become tacky so avoid touching the paint.
The logs and kindling should have a maximum moisture content of 20% but ideally this should be around 12-14%. Even if you are buying kiln dried wood it is a good idea to buy a moisture meter, this will allow you to split some of your logs & test the centre of the freshly split face. Do not burn treated or scrap wood as this will damage the stove & liner invalidating the warranty on both. If your installation has been set up for multifuel burning, only use HETAS approved smokeless fuel, do not burn wood and approved smokeless fuel together as this will create clinker that will block your flue.
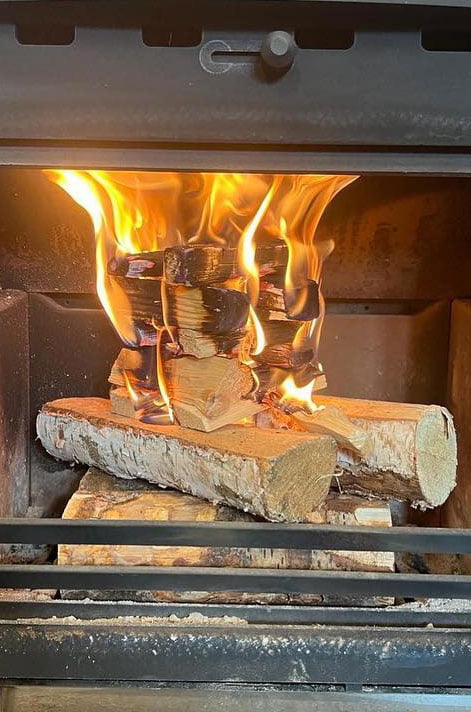
The best way to light a stove is with the top-down technique, this method creates a good clean heat for preheating the flue whilst producing little smoke to escape back into the room and can dramatically help with a cold plug in the flue. (It is an invisible plug of cold air that can form in your chimney when temperature drop significantly, and the chimney is left to go cold. This can result in the flue being plugged, which pushes smoke back down and out of your stove).
Follow These Steps
1
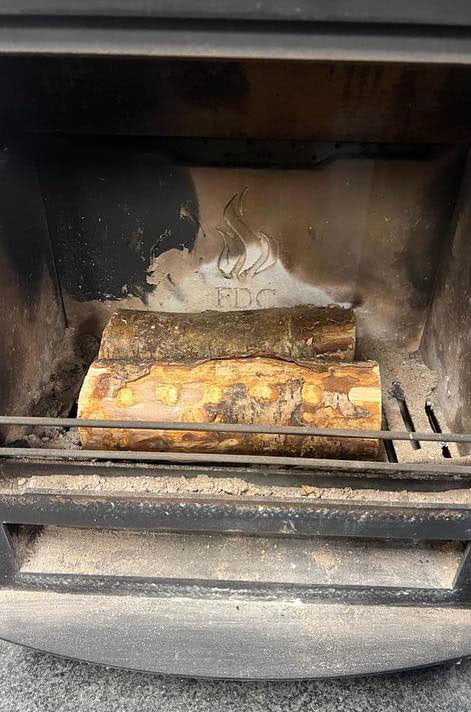
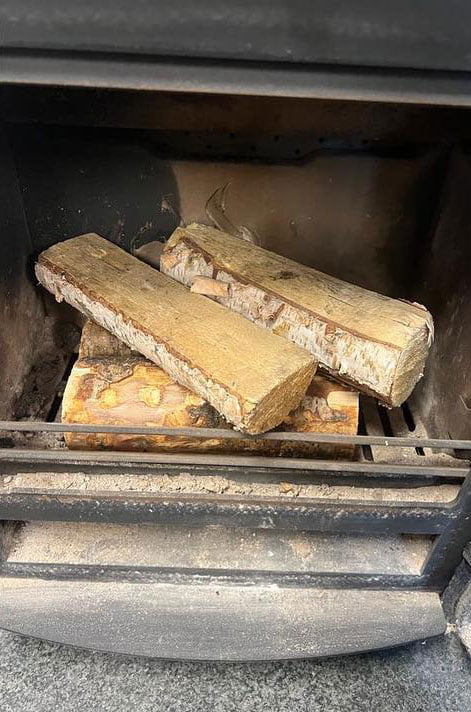
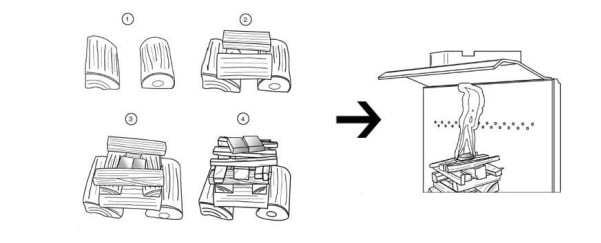
Place two small logs on the base of the stove (if the stove is big enough you can add a 2nd layer of small logs) or a good layer of approved smokeless fuel.
2
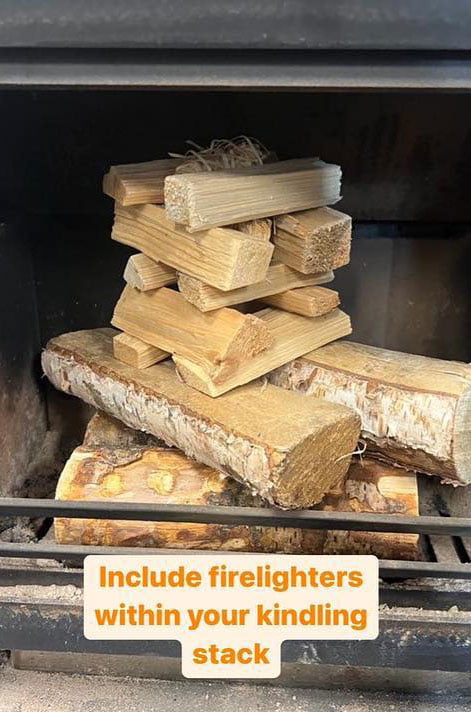
Place 3 kindling sticks on top of the small logs/bed of approved smokeless fuel to create a floor and then place two firelighters on top of the floor.
3
Build kindling walls each side of the fire lights by putting two sticks one way and two the other so they are 4-5 layer high.
4
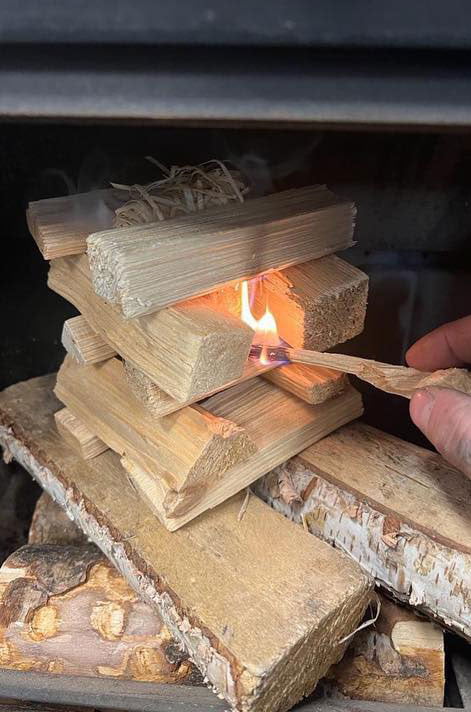
Light the fire lights and leave the door ajar for 1-2 minutes (do not leave the stove unattended at this stage)
5
Once the fire lights have started to catch the kindling alight, close the door fuller and leave the air controls in their lighting position for 20 minutes, this will give time for the logs/approved smokeless fuel beneath to catch.
6
Add additional logs/approved smokeless fuel and allow to establish for 5-10 minutes and then you can close the air controls accordingly to manual. (More air will give more heat but will burn the logs/approved smokeless fuel quicker, less air will give less heat but will give longer burn times).
7
When the flames start to die down its time to add more fuel, open the required air control according to the manual before your open the door to build up the heat of the ember bed. Once this is glowing slowly open the door, so you do not create a vacuum pulling smoke back into the room.
8
Add more logs and close the door. (Please note it is best to add little and often when burning logs rather than trying to squeeze in as much as possible). If burning approved smokeless fuel, then riddle the grate to clear the ash and refuel to the height of the fuel retainer and close the door.
9
Allow the new logs/approved smokeless fuel to establish for 5-10 minutes before adjusting the air control down again.
10
Whilst adjusting the air control down always make sure you have flame visible, if the flames die out on the new logs/approved smokeless fuel, you have closed the air control too far and not giving the logs/approved smokeless fuel enough oxygen, if this happens open the air control back up until the flame is visible again and then close down a bit less. (Every stove and flue will perform differently during different weather conditions, once you get used to the stove you will learn what positions work best after refuelling).
Cleaning & Maintenance
All cleaning and maintenance should be done when the stove is cold.
The air wash on stoves varies dramatically from stove to stove but if your fuel is dry and the air controls are being correctly used the glass should look after itself, but with time this will eventually need to be cleaned.
To clean the glass, use damp kitchen paper/cloth dipped in the cold ash to remove any build up and then buss clean with dry kitchen paper/cloth. If you need to use a stove glass cleaner, spray this on to a cloth and apply to the glass to prevent the liquid running down the glass and into the rope seals as this can damage the seals, paint and glass if left to soak in or use a stove glass gel/paste cleaner again applied using a cloth.
It is good practice to leave a bed of ash in the stove when burning logs, this helps to insulate the embers during each fire. If your stove has a grate and ash pan then riddle the grate to clear before each fire, do not allow the ash to build up through the grate. If you need to empty some of the ash out its best to do this when the stove is cold.
(Please do this into a metal bucket, you may think the stove is cold but hot embers could still be present under the ash).
Your flue needs to be swept at least once a year by a registered sweep who will leave you a certificate. If the sweep does not strip the inside of the stove out during his visit and hoovers out all the ask behind the fire bricks and below the grate, then I recommend you follow the manual and carry this out yourself, this is to help prevent fire bricks cracking and if you have one, grates seizing up. Carrying out this basic service yourself will mean less replacement parts and engineer call outs.
The baffle/throat plate will need to be cleaned at least monthly but please refer to the manufacturer’s instructions for the recommended time frame for this.
Servicing
All stoves will need servicing from time to time replace rope seals on the doors, glass, broken or warn down fire bricks, warped baffle plates and making sure air controls are operating properly. Most of this can be done by yourself by following the manual. (Please note that it is common for firebricks to crack and if the firebrick is staying in place then it is still serving its purpose and will not need replacing).
If the paint on the stove needs to be refreshed, always buy the paint from the stove manufacturer as not all paints will be compatible with others and can cause the original paint to craze or peel.
Cracked or Broken Glass
Stove glass rarely cracks from heat and is usually caused by an external force. This could be trapping fuel between the glass and fuel retainer, closing the door to hard, impact from something outside the stove. The crack or break may not be visible when cold and only opens once the stove is up to temperature. If the glass does crack or break stop using the stove until it has been replaced.
The above information covers all the basics you will need to run your stove successfully for many years. If there is anything else you are not sure of and is not covers in the manual, please don’t hesitate to contact us for advice.

